 |
Before the wing can be mounted it must to be
shaped as closely as possible to its finished shape. A razor plane is
used to rough-in the
leading edge. A long sanding block finishes the job. Do
not make the mistake of giving the leading edge any shape that pleases
you. The leading edge shape should closely match the plan.
In the worst case a poorly shaped leading edge can lead to devastating
stall characteristics.
It is best to cut out a cardstock
template
to place over the leading edge as you shape it. |
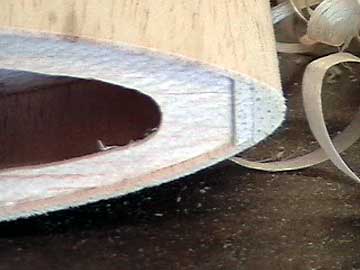 |
This shape very closely matches that of the
airfoil as designed. Notice that the
sheeting and leading edge are
still over-length. The excess must be trimmed and sanded off before proceeding. |
 |
Most plans indicate that the wing tips should be glued on
prior to mounting the wing. In theory that is a good idea, but I
like to mount the wing before the tips are in place.
The shape of the tips is usually open to
interpretation and one tip may or may not exactly match the other.
If the rear, outboard corner of the tip is rounded then there is no set
point to measure from.
Therefore I measure to the last rib.
Wing tips that vary slightly in shape will not
affect flight or
trim characteristics noticeably. |
 |
It is important that the tip ribs are
related identically.
Some wings may have ribs that are not parallel to the centerline of the
aircraft. That is OK, but you will need some type of triangle
template to ensure both ribs are the same.
In this case, as is most common, the tips
are parallel to the aircraft centerline. I use my old, rusty
framing square to ensure the tips are sanded square to the wing. |
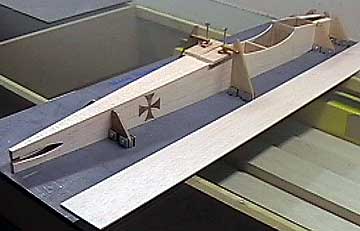 |
The fuselage must be set on a flat surface
large enough so the wing does not over-hang any edge. Use
weights or pin the fuselage to your building board. The important
thing is to ensure that the fuselage can't move. |
 |
Center the wing on the fuselage. I
usually measure each wing tip from the opposite fuselage side because it
provides a convenient point to hold the tape measure. You should be able to get
all matching distances within 1/16" without difficulty. |
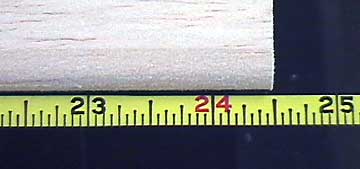 |
The measurement to the left wing tip. |
 |
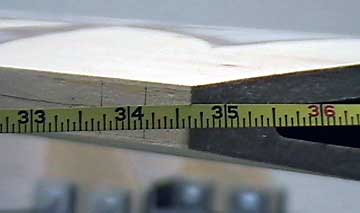
The measurement to the right wing tip.
Both tips are very slightly under 24-1/2" from the opposite fuselage
side. |
 |
Next, measure from the center of the tail-post to each wing tip. If the distance is not the same to each wing
tip, then you will have to adjust it and then go back and re-center the
wing. To clarify — any
time you move the wing you must check all measurements again.
It can get tedious, but if you built accurately in the first place then
it shouldn't take more than two or three iterations to get the wing square. |
 |
The measurement to the right wing tip. |
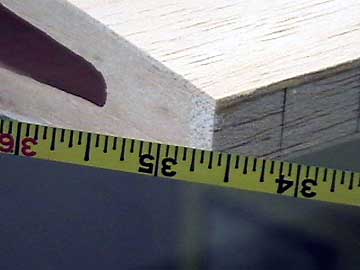 |
The measurement to the left wing tip.
Both measurements are 34-5/8". |
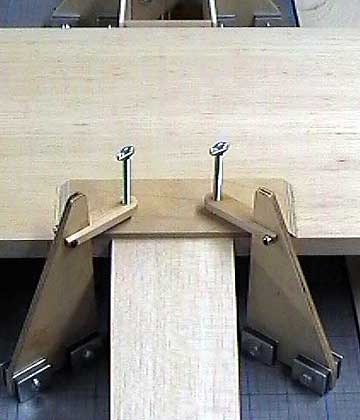 |
Lock the wing in place on the fuselage when
you are satisfied that the wing is square to it. You can use pins,
weight, clamps or anything that will prevent it from moving.
Use a soft pencil or fine-point marker to
make alignment marks on the wing and fuselage. You should make a
minimum of three marks.
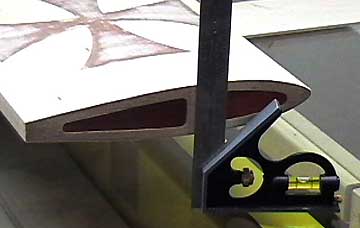
At this point you should check the wing
incidence. If it is correct then you can move along to the next
step. If not then make adjustments to the wing saddle until the
incidence is correct.
Do not continue until you have done this
because it is easiest to adjust before the leading edge
dowels are in
place. |
 |
Check the height of each wing tip. Make adjustments to the
wing saddle
as necessary.
Sand the high saddle or shim the low saddle depending on
whether the wing needs to be raised or lowered. With each
adjustment you should also check the incidence again. Because you have to remove the wing, you will need to go back to the
beginning and re-measure everything. The alignment
marks you made should position the wing very close when it is replaced,
but check anyway.
Do not drill for wing dowels or hold-down
bolts until you are absolutely satisfied the wing is mounted as straight
as it can be. If you do not take your time with this step your
plane will never trim properly.
|

