Airfield Models - How To

Align Cabane Struts on Biplanes and Parasol Wing Aircraft

December 19, 2021


Home
About
What's New
History
Models Gallery
Model Building Safety
Articles
Mail & FAQ
Site Map
Site Feedback
Contact
Add to Favorites
Comments
Search Airfield Models

Back to How-To Articles


Airfield Models (http://www.airfieldmodels.com/)How to Align Cabane Struts on Biplanes and Parasol Aircraft

My Sig Smith Miniplane, like most biplanes, uses cabane struts to mount the wing.  
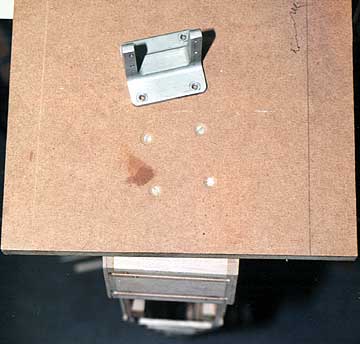
The core of the mount is a plywood plate in the fuselage (F10).  The plywood mounts to 1/4" x 1/2 balsa stock that must be perfectly aligned on both fuselage sides.  If these are wrong then everything that follows will also be wrong.

There are two brass tubes that are J-bolted and epoxied to the plywood plate.  These must also be perfectly aligned.  Into these tubes are epoxied the 
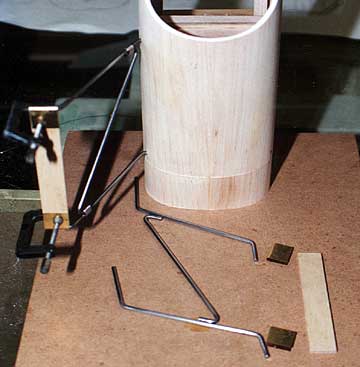
four cabane pieces.  Each of the cabane pieces is made from 1/8" music wire and is bent into a Z shape more or less.  The arrangement makes a parallelogram that may or may not be straight, true and level by the time it is finished.

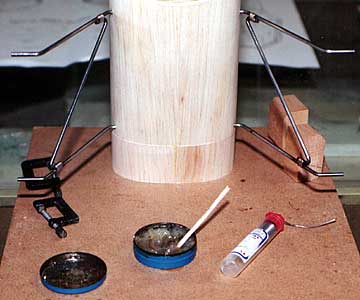
A diagonal piece of music wire is wire wrapped and soldered to the cabanes.  When this is complete two pieces of brass plate are wrapped around the top of the cabanes and soldered in place.  Between the brass pieces is another piece of plywood that is epoxied in place.

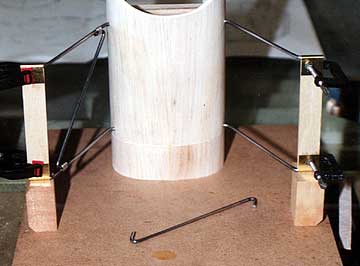
Assuming the plate and tubes are correct in the fuselage, it is still possible to have one set of cabanes rotate further forward or aft of the other.  This will result in the wing being lower on that side of the aircraft.  In theory, the diagonal piece will ensure that the cabanes on both sides are identical.  It does not work out that way in practice unless careful measurements are taken.

Cabane detail from Sig Smith Miniplane plans

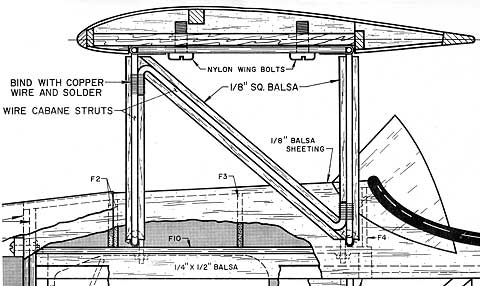
Image from Sig Smith Miniplane plans

First I tried to block the fuselage level and perpendicular to the building surface.  That meant dropping a centerline from the fuselage to the building surface as a reference line.  From this line I would have to go back up to the cabanes to ensure they were aligned properly to the fuselage and each other.

I messed around with this for about an hour before coming to the conclusion that I just couldn't do it with any degree of accuracy.  Eye-balling it would have given me close to the same result.

Then I had a brainstorm.  I knew that the firewall was perpendicular to the fuselage centerline in both top and side view so it could be used as a reference.  Here's how I did it:


Mount the fuselage to a board using the engine mount bolt locations.

First I bolted the fuselage to a flat board using the blind nuts installed for the engine mount.  I wasn't concerned that the fuselage aligned perfectly to the board.  I just wanted to make sure that both sets of cabanes were over the board when the time came to set them up.

Measure the cabane assembly from the board and permanently assemble it. With the fuselage bolted to the board the first set of cabanes is set up as closely as possible to what is indicated on the plan.

The cabanes are supposed to be perpendicular to the thrust line (side view).  The brass and plywood pieces are clamped in place temporarily to ensure the cabanes are properly spaced.

When I was satisfied with the alignment I wrapped and soldered the diagonal strut to both the front and rear cabanes.  I used rosin-core electronics solder.

Note that metal clamps are used.  They act as heat sinks and do not melt.

Make the second cabane to match the first. A block is cut to be a perfect fit underneath the cabane that had been soldered.  A cut-off from the same block is under the second cabane assembly.

In retrospect it is a better idea to make the blocks before soldering the first cabane.

I did not have enough metal clamps for both cabane assemblies, so I have switched the metal clamps to the assembly about to be soldered.  The completed assembly has cooled and plastic clamps have replaced the metal ones.

Both cabanes are very close to being identical which will make setting up the wings much simpler. Now both cabanes are soldered and align perfectly to one another.

Note my expensive, high-tech acid brush carefully fashioned from a scrap of imported South American balsa.


Previous —
Next —

How to Make Foam Tape Servo Mounts
Make a Fiberglass Cowl for a Flying Model Aircraft

Comments about this article


Back to How-To's
Airfield Models Home


Copyright © 2002 Paul K. Johnson